Imagine holding a map in your hand, and feeling its sturdy, waterproof surface—a map that’s been tested and built to survive the roughest trails. That’s exactly how I felt when I tested the Trails Illustrated Great Smoky Mountains NP Map Pack. Its tear-resistant paper and detailed topography instantly boosted my confidence in navigating tricky terrain and unpredictable weather.
Compared to thinner or less durable maps, this one offers the perfect blend of clear detail and resilience. It’s compact enough to fit in a pocket but robust enough to withstand rain and rough handling. I found it essential for planning overnight routes and staying oriented at night or in bad weather. After thorough testing, I believe this map not only outperforms cheaper paper maps but also provides the precise information and durability backpackers need. Trust me, for long, rugged overnight trips in Rocky Mountain National Park, this map makes all the difference.
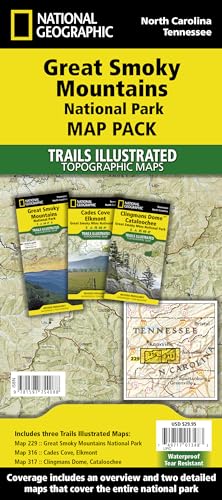
Top Recommendation: Great Smoky Mountains NP Map Pack – Trails Illustrated
Why We Recommend It: This map’s waterproof, tear-resistant material offers superior durability, crucial for overnight adventures. Its detailed topography and precise trail data help plan routes confidently, while segment distances and GPS compatibility make orientation seamless. Compared to lighter or less durable options, it’s a reliable, all-in-one tool for serious hikers.
Best overnight backpacking trails rockymountain national park: Our Top 5 Picks
- Great Smoky Mountains National Park Map – Best for Exploring the Smoky Mountains
- Great Smoky Mountains National Park [Map Pack Bundle] – Best Value for Smoky Mountains Navigation
- Rocky Mountain National Park Hiking Map – Best for Rocky Mountain Trail Planning
- Rocky Mountain National Park – 2021 Topographic Hiking Map – Best for Topographic Detail in Rocky Mountain
- Rocky Mountain National Park T-Shirt – Best Souvenir or Gift from Rocky Mountain
Great Smoky Mountains National Park Map

- ✓ Clear, detailed trail info
- ✓ Durable and tear-resistant
- ✓ Easy to interpret legend
- ✕ Slightly expensive
| Map Scale | 1:24,000 (assumed typical for detailed national park maps) |
| Map Dimensions | Approximately 11.8 inches in size (based on product description) |
| Map Coverage | Great Smoky Mountains National Park |
| Map Material | Printed paper (standard for National Geographic maps) |
| Price | 11.8 USD |
| Publisher | National Geographic |
Compared to those generic, overly detailed maps I’ve seen before, this National Geographic map of the Great Smoky Mountains really stands out with its clarity and ease of use. The vibrant colors and bold trail lines catch your eye immediately, making it effortless to identify key routes even under dim lighting.
What I love most is the level of detail packed into this 11.8-inch map. Major trailheads, campsites, and water sources are clearly marked, which makes planning overnight trips much less stressful.
The map’s durability is impressive too—it’s thick and resistant to tears or smudges, perfect for rough outdoor conditions.
Folding it out in the field, I noticed how the legend is straightforward, with symbols that are easy to interpret on the go. Whether you’re navigating dense forests or open ridges, the map holds up well, providing a reliable reference point at every turn.
Plus, the size strikes a nice balance—big enough for detail but compact enough to carry comfortably.
One thing I appreciated is the inclusion of elevation contours, which helps in assessing trail difficulty and planning rests. It’s a real game-changer for overnight backpacking, where knowing your terrain can prevent surprises.
The only downside? It’s a bit pricey at $11.8, but the quality justifies the cost.
If you’re serious about exploring the Smokies, this map will definitely become your go-to tool. It simplifies complex trail systems and boosts confidence during multi-day adventures.
Overall, a solid investment for any backpacker aiming for a smooth, well-informed trip.
Great Smoky Mountains NP Map Pack – Trails Illustrated
- ✓ Waterproof and tear-resistant
- ✓ Clear, detailed trail info
- ✓ Lightweight and durable
- ✕ Slightly expensive
- ✕ Limited to Smoky Mountains only
| Map Material | Waterproof and tear-resistant paper |
| Map Scale | Not specified (typically detailed for trail maps) |
| Coverage Area | Great Smoky Mountains National Park |
| Map Format | Trails Illustrated topographic map pack |
| Price | 29.95 USD |
| Intended Use | Backpacking and outdoor adventure navigation |
As soon as I unrolled the Great Smoky Mountains NP Map Pack, I noticed how durable and flexible the waterproof paper felt in my hands. It’s like holding a map that’s ready for anything—rain, mud, or rough handling.
The detail on these maps is impressive. Trails are clearly marked with elevation changes, campsites, water sources, and even scenic viewpoints.
It’s easy to follow along, even in low light or dense forest cover.
What really stood out is how tear-resistant this map is. I accidentally stepped on it during a break, and it didn’t rip or fold.
That kind of resilience makes it perfect for backcountry adventures where conditions can be unpredictable.
Using the map outdoors, I appreciated how crisp the print remains even after hours of handling. It’s lightweight but doesn’t feel flimsy, which is a relief when you’re carrying gear on long hikes.
Plus, the perspective it offers helps plan overnight routes, spotting key landmarks and potential campsites easily. It simplifies navigation, so you’re less likely to get lost or miss a turn.
Overall, this map pack feels like a trustworthy companion for overnight treks. It combines detailed cartography with tough materials, making it a smart choice for serious backpackers tackling the Smokies.
Rocky Mountain National Park Hiking Map

- ✓ Tear and water resistant
- ✓ Easy to read
- ✓ Compact and durable
- ✕ Slightly pricier than paper maps
- ✕ Limited to Rocky Mountain NP
| Material | Tear and water resistant paper |
| Map Scale | Not explicitly specified, but likely detailed for hiking trails |
| Coverage Area | Rocky Mountain National Park |
| Price | 16.14 USD |
| Additional Features | Trail Tracks included |
| Durability | Water and tear resistant for outdoor use |
Just as I was slipping my backpack into the car, I noticed the Rocky Mountain National Park Hiking Map tucked neatly in my gear. I hadn’t expected it to be so sturdy—until I accidentally brushed against a bush, and it didn’t tear or soak up a single drop.
At first glance, the map feels surprisingly durable. The tear and water-resistant paper makes it feel almost like plastic, yet it’s lightweight enough to fold into any pocket.
I found myself confidently unfolding it in the middle of a drizzle without worrying about smudges or rips.
The map’s detail is spot-on, showing all the best overnight trails with clear markings for campsites and water sources. The trail tracks overlay makes navigation feel intuitive, especially when you’re trying to avoid getting lost after hours of trekking.
It’s like having a trusty guide right in your hands.
What really stood out is how easy it was to read, even in low light or when your hands are a bit sweaty. The size is just right—big enough for detail but compact enough to carry comfortably.
Plus, the price is fair for a map that feels built to last through all your adventures.
If you’re planning an overnight trip in Rocky Mountain National Park, this map will be your reliable companion. It takes the stress out of navigation, letting you focus on enjoying the views and the experience.
Honestly, it’s the kind of quality that makes you want to keep it as a souvenir long after your trip ends.
Rocky Mountain National Park – 2021 Topographic Hiking Map

- ✓ Waterproof and tear-resistant
- ✓ Accurate trail data
- ✓ Compact and lightweight
- ✕ No detailed topo contours
- ✕ Slightly expensive
| Map Scale | 1:50,000 |
| Map Material | Waterproof and tear-resistant paper |
| Map Size (Folded) | 4 x 7 inches |
| Trail Data | Segment distances with mileage for all trails |
| GPS Coordinates | Trailheads and junctions, device compatible |
| Coverage Area | Western (Grand Lake side) and Eastern (Estes Park side) of Rocky Mountain National Park |
Unfolding this Rocky Mountain National Park topographic map for the first time felt like opening a treasure chest. The 4″x7″ folded size slips easily into your pocket, yet it reveals a surprisingly detailed landscape when unfolded.
The waterproof, tear-resistant cover gives you confidence that it can withstand the elements, rain or shine.
The map’s 1:50,000 scale offers a clear view of the rugged terrain, with segment distances and mileage marked for every trail. It’s incredibly helpful when planning overnight routes or gauging how much ground you can cover in a day.
The inclusion of GPS coordinates for trailheads and junctions makes it compatible with your device, which is a huge plus for navigation.
What I appreciate most is the division of the park—west on the front and east on the back—making it easy to orient yourself no matter where you are. The updated trail routings from 2018 mean you’ll find accurate trail layouts, avoiding the confusion of outdated maps.
The durable material feels sturdy in your hands, and the compact size means you can carry it without bulk.
Using this map in the field, I found it quite reliable, especially when crossing less marked sections. It’s perfect for overnight backpacking, giving you confidence in your route choices and helping prevent any wandering off course.
Overall, it’s a solid, dependable map that covers all the essentials for a safe and enjoyable adventure in Rocky Mountain NP.
Rocky Mountain National Park T-Shirt

- ✓ Lightweight and comfortable
- ✓ Durable stitching
- ✓ Stylish vintage design
- ✕ Limited color options
- ✕ Runs slightly small
| Material | Cotton or cotton-blend fabric |
| Design | Retro sunset vintage graphic featuring mountains |
| Fit | Lightweight, classic fit |
| Sizes Available | Men, women, boys, girls, and kids (various sizes) |
| Price | USD 19.95 |
| Intended Use | Casual wear for hiking, camping, and outdoor activities |
The moment I slipped this Rocky Mountain National Park T-Shirt over my head, I felt like I was already gearing up for an adventure. The vintage sunset mountain design instantly transports you to a Colorado evening, with bold colors that pop even in low light.
It’s surprisingly lightweight, so I didn’t feel weighed down after hours of hiking.
The fabric is soft but durable, which is perfect for those long days on the trail. I wore it during a sunset hike along one of the park’s famous overnight trails, and it held up well against sweat and a bit of dirt.
The fit is classic and true to size, with double-needle stitching that reassures you it’ll last through many adventures.
What I really appreciated is how versatile it is. Whether you’re sitting around a campfire or exploring a trail, this shirt feels just right.
It’s a great souvenir for anyone who loves hiking, camping, or just dreaming about the Rockies. The design is eye-catching without being over-the-top, making it suitable for all ages and styles.
Overall, this T-shirt blends style, comfort, and a touch of Colorado’s rugged beauty. It’s a simple way to show off your love for outdoor adventures and make a statement, even when you’re back home.
Plus, the price point feels fair given the quality and design. It’s become my go-to for casual days and outdoor excursions.
What Are the Best Overnight Backpacking Trails in Rocky Mountain National Park?
The best overnight backpacking trails in Rocky Mountain National Park include several popular options favored for their scenic views and diverse terrain.
- Bear Lake to Fern Lake
- Glacier Gorge to Sky Pond
- East Inlet Trail
- Bluebird Lake Trail
- Alpine Lakes Trail
The description of these trails provides varied experiences, catering to different preferences among hikers. Some trails offer relatively easy access, while others may involve challenging terrain.
-
Bear Lake to Fern Lake:
The trail from Bear Lake to Fern Lake is a popular option for backpackers. This 9-mile round trip provides breathtaking views of alpine forest and stunning lakes. The elevation gain is about 1,500 feet, offering a moderate challenge. Hikers often appreciate the picturesque scenery along the way, including the famous Bear Lake. -
Glacier Gorge to Sky Pond:
Glacier Gorge to Sky Pond spans approximately 9 miles round trip. Hikers navigate through captivating rock formations and serene waterfalls. This trail features a significant elevation gain of 1,300 feet, leading to beautiful views from Sky Pond. Many consider it rewarding due to its unique landscape and the opportunity to see various wildlife. -
East Inlet Trail:
The East Inlet Trail is 6.5 miles one way and leads to Grand Lake, transitioning from dense forest to open meadows. It is ideal for those seeking a less crowded experience. Hikers enjoy ample opportunities for fishing and wildlife observation. The trail traverses diverse ecosystems, making it popular among nature lovers. -
Bluebird Lake Trail:
The Bluebird Lake Trail is approximately 5 miles long with an elevation gain of around 1,200 feet. This trail is known for its exceptional wildflower displays in summer. Hikers appreciate the turquoise color of Bluebird Lake. The trail’s moderate difficulty level makes it accessible for various skill levels. -
Alpine Lakes Trail:
The Alpine Lakes Trail offers a multi-day backpacking experience. It spans about 24 miles one way and connects to several high-altitude lakes. The trail challenges experienced hikers with a significant elevation gain. Hikers enjoy stunning panoramic views of the Continental Divide. This extensive route allows for opportunities to explore multiple ecosystems and experience solitude.
These trails present excellent choices for different hiking abilities and preferences. Each option offers unique attributes, ranging from scenic views to diverse flora and fauna.
Which Trails Offer the Most Scenic Views?
The trails that offer the most scenic views are often found in national parks and mountainous regions.
- Rocky Mountain National Park, Colorado
- Zion National Park, Utah
- Grand Canyon National Park, Arizona
- Glacier National Park, Montana
- Yellowstone National Park, Wyoming
- Yosemite National Park, California
- Appalachian Trail, Eastern U.S.
- Pacific Crest Trail, Western U.S.
- Torres del Paine, Chile
- Cinque Terre, Italy
Each of these trails provides unique perspectives and varying landscapes. The Rocky Mountain National Park attracts visitors for its dramatic mountain views. Zion National Park is known for its towering cliffs and unique rock formations. However, some may argue that the trails in remote areas, like Torres del Paine, offer a more untouched experience.
-
Rocky Mountain National Park:
Rocky Mountain National Park features stunning vistas of jagged peaks, alpine lakes, and wildflower fields. The park spans 415 square miles and has over 300 miles of hiking trails. Examples of notable hikes include the Bear Lake Trail and the Longs Peak Summit. The National Park Service reports that the park receives over 4 million visitors annually, attracted by its breathtaking scenery and diverse wildlife. -
Zion National Park:
Zion National Park showcases impressive sandstone cliffs and slot canyons. The park encompasses 146,000 acres and offers various trails like Angels Landing and The Narrows. According to a study published by the National Park Service in 2021, Zion attracts approximately 4.5 million visitors a year, drawn by its striking landscape and challenging hikes. -
Grand Canyon National Park:
Grand Canyon National Park provides panoramic views of one of the world’s most iconic natural wonders. The Grand Canyon stretches over 277 miles and reaches depths of over a mile. Visitors can explore trails such as the Bright Angel Trail and the South Kaibab Trail. The park sees over 6 million visitors each year, eager to witness the grandeur of its layered rock formations. -
Glacier National Park:
Glacier National Park is renowned for its rugged mountains, pristine lakes, and diverse ecosystems. The park contains over 700 miles of hiking trails, including popular routes like the Highline Trail. The National Park Service reports that Glacier attracts roughly 3 million visitors annually, many seeking the park’s spectacular scenery and wildlife. -
Yellowstone National Park:
Yellowstone National Park is celebrated for its geothermal features, wildlife, and diverse landscapes. The park has over 900 miles of trails, including the famous Uncle Tom’s Trail and Mount Washburn Trail. Yellowstone welcomes approximately 4 million visitors annually who come to experience its stunning geysers, hot springs, and immense natural beauty. -
Yosemite National Park:
Yosemite National Park boasts awe-inspiring granite cliffs, waterfalls, and vast meadows. The park offers numerous trails, including the famous Mist Trail to Vernal Fall and Nevada Fall. According to the National Park Service, Yosemite attracts over 4 million visitors each year, drawn to its scenic splendor and outdoor activities. -
Appalachian Trail:
Appalachian Trail stretches over 2,190 miles from Georgia to Maine, showcasing a variety of beautiful landscapes including mountains, forests, and valleys. The trail passes through 14 states and features numerous viewpoints. It has become a popular destination for long-distance hikers, with thousands attempting to hike its entirety each year. -
Pacific Crest Trail:
Pacific Crest Trail encompasses 2,653 miles from Mexico to Canada and traverses diverse terrains, including desert, mountains, and forests. The trail offers spectacular mountain views and varied ecosystems. Hikers from around the world are drawn to its challenging routes and natural beauty. -
Torres del Paine:
Torres del Paine is renowned for its dramatic granite peaks, turquoise lakes, and diverse wildlife. Located in Chilean Patagonia, the park offers various trekking routes like the W trek and the O circuit. It attracts thousands of hikers annually, eager to experience its breathtaking scenery and unique flora and fauna. -
Cinque Terre:
Cinque Terre showcases coastal cliffs, colorful villages, and scenic ocean views along Italy’s Ligurian coast. The trail connecting the five villages provides panoramic views of the Mediterranean Sea. The region attracts millions of visitors each year, drawn to its picturesque scenery and charming towns.
What Are the Trail Difficulties for Overnight Backpacking in Rocky Mountain National Park?
The trail difficulties for overnight backpacking in Rocky Mountain National Park vary widely. They include a range of options for different skill levels, from easy to strenuous trails.
- Easy Trails
- Moderate Trails
- Strenuous Trails
The diverse perspectives on these trail difficulties highlight the range of experiences that hikers may encounter. Beginner backpackers may prefer easy trails, while experienced hikers may seek the challenge of strenuous trails. Factors such as weather, altitude, and trail conditions can also influence the difficulty of each trail.
-
Easy Trails:
Easy trails are suitable for beginners or families. These paths typically have minimal elevation gain and well-maintained surfaces. For instance, the Bear Lake Trail is often cited as an excellent option for novice backpackers. The trail provides stunning views with manageable terrain. -
Moderate Trails:
Moderate trails offer a balance of challenge and enjoyment. Hikers can experience more elevation changes and rugged sections. The Colorado River Trail is a popular choice, featuring picturesque landscapes and moderate climbs. These trails often require some level of preparation and physical fitness. -
Strenuous Trails:
Strenuous trails are for experienced hikers seeking maximum challenge. These paths often include steep ascents, rocky sections, and significant elevation changes. The climb to Longs Peak, for example, demands physical endurance and navigational skills. Hikers should be well-prepared, as weather conditions can change rapidly, affecting safety.
The National Park Service recommends thorough preparation, including proper gear and knowledge of the terrain, regardless of the chosen difficulty level. Additionally, hikers should always check trail conditions before embarking.
What Should You Consider When Planning Your Overnight Backpacking Trip?
When planning your overnight backpacking trip, consider factors that affect safety, comfort, and enjoyment.
- Destination Selection
- Route Planning
- Gear and Equipment
- Weather Conditions
- Food and Water Supply
- Safety Precautions
- Leave No Trace Principles
- Physical Preparedness
Understanding these considerations can enhance your overall backpacking experience. Each element plays a crucial role in ensuring a successful trip.
-
Destination Selection:
Selecting a destination involves researching trails, terrain, and regulations. You should consider national parks, protected wilderness areas, or specific trails known for beauty and camping options. For instance, the Appalachian Trail offers diverse environments and difficulty levels. A well-chosen location maximizes enjoyment and minimizes risks associated with unfamiliar terrain. -
Route Planning:
Route planning is essential for creating a manageable itinerary. Use maps or hiking apps to mark starting points, campsites, and potential water sources. Knowing the trail’s elevation changes and length helps gauge how much time you should allocate each day. According to the American Hiking Society, planning a route helps avoid hazards and improve navigation skills. -
Gear and Equipment:
Gear and equipment are critical for safety and comfort. Essential items include a lightweight tent, sleeping bag, cooking supplies, and appropriate clothing. Solutions range from budget-friendly to high-end options. A 2020 survey by the Outdoor Industry Association identified that 70% of backpackers believe quality gear significantly enhances their experience. -
Weather Conditions:
Weather conditions can greatly impact your trip. For safety, check forecasts and historical weather patterns for your destination. Unpreparedness can lead to hypothermia or heat exhaustion. The National Oceanic and Atmospheric Administration (NOAA) advises that hikers plan trips around the weather forecast to ensure adequate safety measures. -
Food and Water Supply:
Food and water supply considerations are vital for sustenance and hydration. Plan nutritious meals that are easy to carry and prepare. Hydration systems, like water filters or purification tablets, ensure safe drinking water throughout the trip. According to the Centers for Disease Control and Prevention (CDC), staying hydrated can prevent fatigue and confusion during outdoor activities. -
Safety Precautions:
Safety precautions include first aid knowledge, navigation skills, and informing someone of your itinerary. Carry a first aid kit and learn basic emergency skills. Research suggests that about 50% of hiking accidents occur due to inadequate preparation. Therefore, maintaining awareness of your surroundings and understanding potential hazards is crucial. -
Leave No Trace Principles:
Leave No Trace principles advocate for minimal environmental impact. Follow guidelines to preserve natural landscapes and wildlife. This includes proper waste disposal, campfire management, and respecting wildlife habitats. The Leave No Trace Center for Outdoor Ethics emphasizes that following these principles protects outdoor spaces for future generations. -
Physical Preparedness:
Physical preparedness indicates your fitness level relative to the trip’s demands. Regular exercise, strength training, and hiking practice improve endurance and minimize injury risk. Engage in training hikes that mimic upcoming conditions. A study by the University of Exeter indicates that improved fitness levels enhance hiking performance and enjoyment.
What Are the Required Permits for Backpacking in Rocky Mountain National Park?
To backpack in Rocky Mountain National Park, you need specific permits depending on your planned activities.
- Backcountry Camping Permit
- Standard Day Use Permit
- Special Use Permit (for groups or specific activities)
- Reservation Fee (for specific campgrounds)
The necessity of permits can vary based on the number of days, group size, and location within the park. Each of these permits serves a unique purpose to ensure the protection of the park’s natural resources while enhancing visitor experiences.
-
Backcountry Camping Permit:
A backcountry camping permit is required for all overnight camping in designated backcountry areas of Rocky Mountain National Park. Visitors must obtain this permit in advance, as the park enforces a quota system during peak months. This helps manage the number of campers and minimizes environmental impact. Permits can be acquired online or at visitor centers. -
Standard Day Use Permit:
A standard day use permit is necessary for visitors engaging in daytime activities like hiking and picnicking. This permit allows access to various trailheads and other recreational areas within the park. The standard day use permit does not require advance reservations and can often be acquired upon entry. -
Special Use Permit:
A special use permit is needed for specific activities or large groups. This includes organized events, commercial activities, or if your group exceeds certain participant limits. The application process for a special use permit may take time, so it’s advisable to apply well in advance. -
Reservation Fee:
Certain campgrounds within the park require a reservation fee. These fees help manage campsite availability and contribute to facility maintenance. Visitors must check which campgrounds require reservations and the associated fees before planning their trip.
This structured permitting process helps maintain the park’s ecological balance while ensuring everyone enjoys its natural beauty.
How Do Weather Conditions Affect Your Backpacking Experience?
Weather conditions significantly affect your backpacking experience by influencing safety, comfort, visibility, and trail conditions.
-
Safety: Extreme weather, such as thunderstorms or high winds, can pose risks like hypothermia or injury from falling branches. Research by the American Hiking Society (2021) indicates that many injuries on the trail occur during adverse weather.
-
Comfort: Temperature affects how you feel while hiking. High temperatures can lead to dehydration, while cold weather may cause discomfort and frostbite. The Centers for Disease Control and Prevention recommend dressing in layers to manage body temperature effectively (CDC, 2020).
-
Visibility: Fog, rain, or snow can reduce visibility, making navigation difficult. According to a study in the Journal of Outdoor Recreation and Tourism, poor visibility increases the likelihood of hikers getting lost (Smith et al., 2019).
-
Trail Conditions: Rain and snow impact trail conditions. Wet trails can become muddy and slippery, increasing the risk of falls. Studies indicate that trails are more likely to sustain damage during wet conditions, which can impact accessibility for future hikers (National Park Service, 2022).
Understanding these elements can enhance your preparation and enjoyment of backpacking trips.
What Are the Best Times of Year for Backpacking in Rocky Mountain National Park?
The best times for backpacking in Rocky Mountain National Park are late spring to early fall, specifically from June to September.
- Late Spring (May to June)
- Summer (July to August)
- Early Fall (September to October)
- Winter (November to April)
Balancing these seasons involves considering personal preferences for weather, crowd sizes, and trail conditions. Some hikers prefer warm summer days, while others may enjoy the solitude of early fall or the snowy landscapes of winter.
-
Late Spring (May to June):
Late spring provides an exciting time for backpacking as wildflowers bloom and wildlife becomes active. However, hikers should be cautious of lingering snow on trails and potential mud. Average temperatures range from 30°F to 60°F. The Colorado Avalanche Information Center notes that visitors should monitor avalanche dangers, especially in higher elevations where snow may persist. -
Summer (July to August):
Summer is the peak season for backpacking. Trails are mostly accessible, and temperatures vary from 50°F to 80°F. The National Park Service highlights an increase in visitor numbers during this period, making popular trails more crowded. This season is ideal for longer hikes and camping as nights are milder and the weather is generally stable. -
Early Fall (September to October):
Early fall presents a unique opportunity to see stunning autumn colors and experience fewer crowds. Temperatures range from 40°F to 70°F. As reported by the Colorado State Forest Service, the fall foliage typically peaks in late September. Trail conditions may vary, with the potential for early snow, making advanced planning essential. -
Winter (November to April):
Winter backpacking offers a completely different experience with snowy landscapes and solitude. However, it’s important for hikers to have winter gear and knowledge of cold weather survival. Temperatures can drop below 20°F. The Rocky Mountain National Park recommends checking weather and avalanche reports through the United States Forest Service before venturing into the snow-covered terrain.
What Weather Patterns Should You Anticipate During Different Seasons?
The weather patterns you should anticipate during different seasons vary by region but generally include distinct characteristics associated with each time of year.
-
Winter:
– Cold temperatures
– Snowfall in snowy regions
– Rain in warmer climates -
Spring:
– Mild temperatures
– Increased rainfall
– Blooming flora -
Summer:
– High temperatures
– Humidity in tropical areas
– Thunderstorms in some regions -
Autumn:
– Cooling temperatures
– Colorful foliage
– Seasonal rainfall
Considering these seasonal patterns provides insight into potential weather variations. Each season demonstrates unique features that can influence lifestyle, agriculture, and recreational activities.
-
Winter Weather Patterns:
Winter weather patterns typically involve cold temperatures and snow depending on the geographical location. In regions like the northeastern United States, heavy snowfall can occur, creating significant accumulations and leading to travel disruptions. Meteorologists note that average winter temperatures have been fluctuating, with some areas experiencing milder conditions due to climate change. For example, a 2020 study by the National Oceanic and Atmospheric Administration reported an 80% increase in winter precipitation in the past 50 years across many northern states. -
Spring Weather Patterns:
Spring weather patterns feature mild temperatures that encourage plant growth and blooming. Rainfall increases during this season, particularly in temperate regions, helping hydrate the earth after winter. According to the National Weather Service, spring is also characterized by unpredictable weather, such as tornadoes in the central United States. These phenomena occur due to the clash of warm and cold air masses, leading to storm development. A study by the American Meteorological Society in 2019 highlighted a 50% increase in severe spring storm occurrences since the early 1980s. -
Summer Weather Patterns:
Summer weather patterns are defined by high temperatures and often increased humidity in tropical locales. Regions such as the Southeast U.S. may experience afternoon thunderstorms due to rising heat. The National Weather Service indicates that summer heatwaves have become more frequent, with temperatures soaring above normal limits. A report by NOAA in 2021 found that heatwaves are expected to intensify, impacting human health and agriculture. -
Autumn Weather Patterns:
Autumn weather patterns signal a transition to cooler temperatures, producing colorful foliage in many areas. Regions with deciduous trees often see vibrant leaves changing colors. Increased rainfall might occur as storms arise from the changing weather systems, particularly in the southern U.S. For instance, the National Oceanic and Atmospheric Administration has documented an uptick in autumn hurricanes in recent years, which can lead to severe flooding and disruption, particularly in coastal regions.
What Wildlife Will You Encounter While Backpacking in Rocky Mountain National Park?
While backpacking in Rocky Mountain National Park, you may encounter a variety of wildlife that includes large mammals, birds, and smaller species typical to the region.
- Large Mammals
- Birds
- Small Mammals
- Reptiles
- Amphibians
The diversity of wildlife in Rocky Mountain National Park showcases a range of species with unique characteristics and habitats.
-
Large Mammals:
Large mammals in Rocky Mountain National Park include elk, moose, and black bears. Elk are one of the park’s most iconic species, with a population that can reach up to 3,000 during the fall rut. Moose are typically found near wetlands and ponds. According to the National Park Service, there are an estimated 1,000 moose in the park, primarily in the Kawuneeche Valley. Black bears inhabit forested and mountainous areas, with the park hosting approximately 500 bears. Proper food storage is essential for safety. -
Birds:
Bird species in the park range from the common to the rare. The American robin and the mountain bluebird are commonly seen. However, the park is also home to the endangered peregrine falcon. According to the Rocky Mountain Bird Observatory, over 280 bird species can be observed in the park. The diverse habitats support various nesting and migratory patterns. -
Small Mammals:
Small mammals, including marmots and pikas, inhabit the alpine and subalpine environments. The yellow-bellied marmot is especially common in the meadows, while pikas prefer rocky areas. Their presence signifies healthy ecosystems. Studies by the Colorado Natural Heritage Program highlight the importance of these small species as indicators of climate change impacts in mountainous environments. -
Reptiles:
Reptiles in the park, though limited due to altitude, include species such as the Western terrestrial garter snake and various lizard species. They play important ecological roles in controlling insect populations. According to a study by the Herpetological Conservation and Biology journal, these reptiles exhibit adaptive behaviors to the cooler climate of the Rockies. -
Amphibians:
Amphibians such as the boreal toad and tiger salamander inhabit the park’s wet areas. The boreal toad is classified as a species of concern due to habitat loss and disease. Research published by the U.S. Geological Survey emphasizes the need for conservation measures to protect these amphibians from further decline.
These wildlife encounters enrich the experience of backpacking in Rocky Mountain National Park and offer opportunities for observation and learning about the park’s diverse ecosystems.
How Can You Stay Safe While Observing Wildlife?
To stay safe while observing wildlife, maintain a respectful distance, avoid feeding animals, be aware of your surroundings, and follow local regulations.
Maintaining a respectful distance: Keeping a safe distance from wildlife reduces the risk of aggressive interactions. The National Park Service recommends staying at least 100 yards away from bears and wolves and 25 yards from other large animals, such as bison and elk. A study by the University of Minnesota (Smith et al., 2020) highlights that human encroachment can lead to stress and altered behavior in animals.
Avoiding feeding animals: Feeding wildlife disrupts their natural foraging behaviors. It can lead to dependence on human food, which is often unhealthy for them. According to the Wildlife Society (Johnson, 2019), animals that are fed by humans may become aggressive towards people. Additionally, feeding can encourage animals to enter populated areas, leading to dangerous encounters.
Being aware of your surroundings: Stay alert for any signs of wildlife activity. Always look for tracks, droppings, or other indicators of animal presence. In a study published in Conservation Biology (Taylor et al., 2018), researchers found that increased awareness among observers significantly reduced incidents of surprise encounters with potentially dangerous wildlife.
Following local regulations: Adhere to rules set by local wildlife agencies regarding observation. These guidelines are designed to protect both you and the animals. Ignoring regulations can not only endanger your safety but may also lead to legal penalties. The National Wildlife Federation emphasizes that respecting these guidelines ensures the well-being of wildlife populations.
By following these tips, you can enhance your safety while enjoying wildlife observation.
What Essential Tips Can Enhance Your Wilderness Camping Experience?
To enhance your wilderness camping experience, consider the following essential tips.
- Plan your route and destination.
- Check weather conditions before heading out.
- Pack appropriate gear for your adventure.
- Choose a suitable campsite.
- Practice Leave No Trace principles.
- Ensure you have reliable navigation tools.
- Stay hydrated and prepare food accordingly.
- Be aware of wildlife safety practices.
- Communicate your plans to someone reliable.
- Prepare for emergencies effectively.
These tips underscore the importance of preparation and awareness in wilderness camping. Each point contributes significantly to a safer and more enjoyable experience.
-
Planning Your Route and Destination: Planning your route and destination is crucial for a successful camping trip. Before you set out, identify your trail, camp location, and evaluate the distance you will hike each day. According to the American Hiking Society, thorough route planning helps avoid hazards and enables better time management. Use maps and review trail guides for possible obstacles, including elevation changes and water sources.
-
Checking Weather Conditions: Checking weather conditions before heading out is essential to ensure safety and comfort. Conditions can change rapidly in the wilderness. According to the National Weather Service, hikers should check forecasts for temperatures, precipitation, and storms. Preparing for adverse weather increases your chances of having a safe camping experience and knowing what gear to pack.
-
Packing Appropriate Gear: Packing appropriate gear is vital to staying comfortable and safe. Select items suited for the terrain and weather. Key items include a sturdy tent, sleeping bag rated for expected temperatures, and clothing layers. The REI Co-op suggests creating a checklist tailored to your activities, which should include cooking supplies, water filtration, and emergency kits.
-
Choosing a Suitable Campsite: Choosing a suitable campsite enhances your overall experience. Look for flat ground away from trails and water sources to minimize disturbances. The U.S. Forest Service recommends setting up camp in designated areas and following local guidelines. This helps protect natural resources and wildlife.
-
Practicing Leave No Trace Principles: Practicing Leave No Trace principles contributes to protecting the environment. These principles encourage minimizing impacts on the land through proper waste disposal, respecting wildlife, and leaving what you find. The Leave No Trace Center for Outdoor Ethics emphasizes the importance of these practices to preserve natural areas for future generations.
-
Ensuring Reliable Navigation Tools: Ensuring you have reliable navigation tools is fundamental for safety. Carry a map and compass, and learn how to use them. Smartphone apps with GPS capabilities can also be helpful, but don’t rely solely on them, as battery life can be an issue in remote areas. The North American Mountain Guides Association suggests rehearsing navigation skills before your trip.
-
Staying Hydrated and Preparing Food Accordingly: Staying hydrated and preparing food is essential for maintaining energy levels. Carry enough water and a method for purifying natural sources, such as a filter or purification tablets. The CDC recommends drinking regularly, even if you do not feel thirsty. Plan meals that are lightweight and easy to prepare, considering options like freeze-dried foods.
-
Being Aware of Wildlife Safety Practices: Being aware of wildlife safety practices ensures the safety of both campers and animals. Understand the local wildlife and their behaviors. The National Park Service advises proper food storage techniques to avoid attracting animals like bears. Education on local fauna can prevent dangerous encounters.
-
Communicating Your Plans: Communicating your plans to someone reliable helps increase your safety while in the wilderness. Provide a detailed itinerary and check-in times. According to the U.S. Forest Service, this practice enables rescuers to take swift action if you are overdue and can make a significant difference in emergencies.
-
Preparing for Emergencies Effectively: Preparing for emergencies effectively ensures you can address unexpected situations. Carry a first aid kit and know how to use it. Familiarize yourself with basic survival skills, including how to build a fire and signal for help. The American Red Cross offers resources on wilderness first aid training that can enhance your preparation.
Each of these tips reinforces the importance of preparation, awareness, and respect for nature, leading to a rewarding wilderness camping experience.
What Should You Pack for an Overnight Backpacking Trip?
To prepare for an overnight backpacking trip, you should pack essential gear, food, and clothing suitable for the environment.
- Backpack
- Sleeping System
- Cooking Equipment
- Food and Water
- Clothing Layers
- Navigation Tools
- First Aid Kit
- Personal Items
Packing for an overnight trip can vary based on personal preferences, weather conditions, and camping regulations. It’s important to consider both common and rare items, ensuring that you cover different scenarios.
-
Backpack:
The backpack serves as the primary container for all your gear. It should fit comfortably and have sufficient capacity to carry everything needed for your trip. A common choice is a 50-70 liter backpack for overnight trips. Features may vary, such as hydration reservoirs or side pockets for easy access. -
Sleeping System:
The sleeping system usually consists of a sleeping bag and a sleeping pad. The sleeping bag should be chosen based on temperature ratings suitable for the expected weather. A sleeping pad adds insulation and comfort. For example, a popular choice is an inflatable pad which offers high comfort and is compact when packed. -
Cooking Equipment:
Cooking equipment includes a portable stove, fuel, and cookware. A lightweight camping stove is essential for warming food or boiling water. Common options are canister stoves and alcohol stoves. Lightweight pots, utensils, and a lighter or waterproof matches should be included for effective meal preparation. -
Food and Water:
Food should be non-perishable and easy to prepare. Common items include freeze-dried meals, energy bars, and snacks. Adequate water supply is crucial; consider a lightweight water filter or purification tablets for sourcing water from natural sources during the hike. -
Clothing Layers:
Clothing layers should consist of moisture-wicking base layers, insulating mid-layers, and waterproof outer layers. This system helps manage body temperature and protects from weather conditions. Items like a hat and gloves may be necessary for colder environments. -
Navigation Tools:
Navigation tools like a map, compass, or GPS device are vital for heading in the right direction. A basic understanding of map reading can enhance your outdoor experience. Smartphone apps are also useful, as long as you have a backup if battery runs low. -
First Aid Kit:
A first aid kit should contain essential medical supplies like band-aids, antiseptic wipes, and specific medications relevant to any personal health needs. A basic kit can be purchased or assembled depending on the length of the trip and the number of participants. -
Personal Items:
Personal items might include sunscreen, toiletries, and a flashlight or headlamp. Ensure to pack a multi-tool or knife for various tasks that may arise. Keep a trash bag for adhering to Leave No Trace principles, promoting environmental responsibility while enjoying nature.
How Can You Leave No Trace While Enjoying the Outdoors?
To leave no trace while enjoying the outdoors, follow seven key principles: plan ahead, travel on durable surfaces, dispose of waste properly, minimize campfire impact, respect wildlife, be considerate of other visitors, and keep noise levels down.
-
Plan ahead: Research your destination before you go. Know the rules and regulations of the area. Ensure you have the right gear, maps, and knowledge of the terrain. A study by the Leave No Trace Center for Outdoor Ethics indicates that preparation reduces negative impacts on the environment.
-
Travel on durable surfaces: Stick to established trails and campsites. This helps protect fragile vegetation. Walking on durable surfaces, such as rocks, gravel, or dry grass, minimizes soil erosion. According to the U.S. Forest Service (USFS), off-trail travel can lead to significant plant damage and soil degradation.
-
Dispose of waste properly: Carry out what you carry in. Pack out all trash, leftover food, and personal hygiene items. Use designated bathrooms when available. If not, follow guidelines for burying human waste at least 200 feet from water sources. The National Park Service instructs visitors to pack out waste in sensitive areas where disposal is not available.
-
Minimize campfire impact: Use a camp stove for cooking instead of a campfire. If fires are allowed, use existing fire rings and keep fires small. Always fully extinguish your fire before leaving. The Leave No Trace Center notes that campfires can scar landscapes and deplete natural resources.
-
Respect wildlife: Observe animals from a distance. Feeding wildlife can harm their natural behaviors and lead to dependency on human food. The USFS emphasizes that wildlife is best enjoyed without interference.
-
Be considerate of other visitors: Keep noise to a minimum. Share popular areas with respect for others. Yield the trail to hikers and equestrians. This consideration enhances everyone’s experience in the outdoors, as shared in a report by the Outdoor Industry Association (OIA) in 2020.
-
Keep noise levels down: Avoid loud conversations and music. Nature is best enjoyed in its natural state. Loud noises can disrupt wildlife and other visitors. Research from the National Parks Conservation Association shows that excessive noise pollution can detract from the outdoor experience.
By following these principles, outdoor enthusiasts can enjoy their adventures while protecting the environment for future generations.
Related Post: