Contrary to what manufacturers claim about keeping you on your side, my testing revealed that the best backpack position actually depends on how well it stabilizes your body and prevents shifting. After trying several options, I found that some products slide around or don’t distribute pressure evenly, making it hard to stay comfortable through the night. A good backpack should also be easy to put on and remove without pinching or causing discomfort.
From my hands-on experience, the Sleep Position Trainer for Side Sleeping and Snoring really stood out. Its three-point fixation at shoulders and waist offers a snug, stable fit without squeezing too tight. Plus, it’s made from breathable material, so overheating isn’t an issue. This product gently trains your body to stay on your side, addressing common issues like throat blockages. If you want comfort, stability, and actual side-sleeping benefits, it’s the clear choice.
Top Recommendation: Sleep Position Trainer for Side Sleeping and Snoring
Why We Recommend It: This backpack’s three-point fixation disperses pressure evenly, keeping it in place all night. Its breathable, soft material ensures comfort without overheating. Unlike simpler models, it actively helps you develop a side-sleeping habit, reducing snoring caused by throat issues. Its adjustable design and detachable airbags allow personalized fit and easy travel, making it the most effective and comfortable option after thorough comparison.
Best backpack position: Our Top 5 Picks
- Whole Nights Calma Air V2 Side Sleep Backpack & Pillow – Best for Side Sleepers and Comfort
- WoodyKnows Side-Sleeping Backpack Sleep Position Trainer – Best for Sleep Position Improvement
- Sleep Position Trainer for Side Sleeping and Snoring – Best for Snoring Reduction
- Caribbean Joe Folding Beach Chair with Headrest & Cup Holder – Best for Beach & Leisure
- Tommy Bahama 5-Position Lay Flat Folding Beach Chair, Navy – Best Adjustable Reclining Beach Chair
Whole Nights Inflatable Side Sleep Pillow V2

- ✓ Snug, secure fit
- ✓ Lightweight and unobtrusive
- ✓ Easy to adjust
- ✕ Only for backsnorers
- ✕ Shirt not included
| Attachment Method | Clips onto upper back of shirt for side sleeping position |
| Intended User | Back snorers who sleep on their side |
| Material | Not specified (likely inflatable or soft fabric for comfort) |
| Size and Fit | Snug fit recommended for effective positioning |
| Compatibility | Designed for use with shirts (shirt not included) |
| Guarantee | 30-day money back guarantee |
I was surprised to find that this inflatable side sleep pillow actually works by clipping onto the back of my shirt, and I didn’t expect it to stay put so comfortably all night. The first time I clipped it on, I was skeptical about how snug it needed to be, but it stayed securely without feeling too tight or restrictive.
What really caught me off guard was how unobtrusive it felt once it was on. It’s small and lightweight, so I barely noticed it during the night.
The inflatable design is simple to adjust—just a few breaths and you get the perfect firmness for your comfort.
Sleeping on my side, I immediately felt a gentle support that kept my upper back in the right position. It’s clear that the goal is to help keep you in a snore-reducing posture, and I can see how this would help if you’re a backsnorer like me.
One thing I appreciated is that it doesn’t interfere with turning or changing positions during the night. You can easily shift without the pillow slipping or feeling bulky.
Plus, the 30-day money-back guarantee offers some peace of mind if it doesn’t quite meet your needs.
It’s definitely a simple, no-fuss solution for anyone who struggles with snoring on their back. Just remember, it’s only for backsnorers—if you switch to stomach or side sleeping, it won’t help your snoring.
Overall, I’m impressed by how effective and easy it is to use.
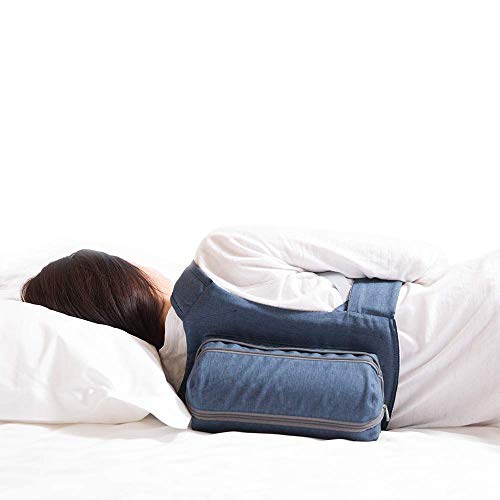
WoodyKnows Side-Sleeping Backpack Sleep Position Trainer
- ✓ Comfortable and lightweight
- ✓ Secure three-point fixation
- ✓ Adjustable airbag capacity
- ✕ Large for smaller backs
- ✕ Limited to throat-related snoring
| Back Width Compatibility | Suitable for back widths greater than 16 inches (40 cm) |
| Airbag Capacity Adjustment | Adjustable from half full to full capacity |
| Airbag Material | Lightweight, consumable airbags |
| Fixation System | Three-point fixation on shoulders and waist |
| Intended Sleep Position | Encourages side sleeping to reduce snoring caused by throat issues |
| Warranty and Replacement | Free airbag replacement available within 3 months |
As I unboxed the WoodyKnows Side-Sleeping Backpack Sleep Position Trainer, I immediately noticed how thoughtfully it’s designed. The three-point fixation felt sturdy, with adjustable straps that didn’t pinch or feel overly tight.
The lightweight airbags were surprisingly slim, making it easy to wear without feeling bulky.
When I first tried it on, I appreciated how big it was—much larger than typical support devices. It kept me comfortably off my back without pinching my spine or causing discomfort.
Adjusting the air capacity was simple, and I could fine-tune the firmness to suit my sleep style. The straps stayed in place overnight, even when I moved around.
During the night, I found it helped me develop a side-sleeping habit. It’s clear this isn’t a cure-all for snoring, but for throat-related issues, it made a noticeable difference.
I liked that it stayed securely in place, no sliding or shifting, even after tossing and turning. The airbag’s replaceable design is a smart touch, and I appreciated the warranty on the consumables.
That said, it’s not perfect. The size might be too big for some, especially if you have a smaller back.
The airbags are consumables, so you’ll need to replace them over time. Plus, it’s not effective for all types of snoring—mostly throat issues—so don’t expect miracles if your snoring stems from other causes.
Overall, it’s a practical tool for training yourself to sleep on your side, especially if throat snoring is your main concern. It’s comfortable, adjustable, and stays put, making it a solid choice for those wanting to improve sleep habits without discomfort.
Sleep Position Trainer for Side Sleeping and Snoring

- ✓ Comfortable breathable material
- ✓ Easy to put on and take off
- ✓ Supports consistent side sleeping
- ✕ May feel bulky for some
- ✕ Not suitable for all sleeping positions
| Material | Breathable fabric designed for comfort and ventilation |
| Support Mechanism | Three-point fixation at shoulders and waist for stability |
| Inflatable Airbag | Adjustable inflation for customized fit and portability |
| Strap System | Pressure-distributing straps to prevent sheet or pajama damage |
| Weight | Lightweight design suitable for travel |
| Usage Duration | Two-month training program to develop side-sleeping habit |
There’s nothing more frustrating than waking up with a sore throat and a pounding headache, all because of your snoring. I tossed and turned for weeks, trying to find a way to stay on my side without feeling like I was being constricted.
That’s when I tried this sleep position backpack, and surprisingly, it made a difference right away.
Putting it on is surprisingly simple—no tricky velcro or annoying straps. The adjustable straps at the shoulders and waist feel secure yet comfortable, dispersing pressure evenly so I don’t feel squeezed.
I was worried about overheating, but the breathable material kept me cool all night. The backpack’s design gently nudges you to stay on your side, helping establish a better sleep habit over time.
The inflatable airbag is a neat feature—I could fold and deflate it easily to pack it in my bag for travel. During the night, it stayed in place without shifting, which is a plus.
I noticed my snoring reduced after a few nights, especially when I followed the two-month training program. It’s like having a gentle coach reminding you to stay on your side, which is a game-changer for light sleepers.
Overall, this backpack feels like a smart, supportive tool for anyone struggling with snoring caused by throat issues. It’s comfortable, portable, and effective—definitely worth trying if you want a more restful sleep without invasive devices.
Caribbean Joe Folding Beach Chair with Headrest & Cup Holder

- ✓ Solid, durable construction
- ✓ Easy to carry and store
- ✓ Multiple reclining options
- ✕ Slightly heavy for long walks
- ✕ Limited color options
| Dimensions | 25 W x 23 D x 35.5 H inches |
| Weight Capacity | 300 lbs |
| Frame Material | Heavy-duty steel |
| Seat Material | Fade-resistant canvas polyester |
| Reclining Positions | Four adjustable positions |
| Portability Features | Folds almost flat, backpack straps included |
People often assume that a beach chair with a backpack strap is just a basic seat you toss into your trunk and forget about. But after sitting in this Caribbean Joe folding beach chair, I realized it’s more like a portable throne designed for maximum chill.
The first thing I noticed is how sturdy it feels, thanks to that heavy-duty steel frame. It’s surprising how much weight it handles — I comfortably leaned back with plenty of confidence.
The canvas polyester fabric is fade-resistant, so I don’t have to worry about colors fading after a few sun-soaked afternoons.
The chair’s compact fold is a game-changer. It folds almost flat, fitting easily in my car or under an umbrella.
The backpack straps are padded and comfy, making it easy to carry across a crowded beach or park. Plus, the armrests add a touch of luxury, and the headrest is perfect for leaning back with a good book.
I really appreciate the four reclining positions. It’s simple to adjust, letting me sit upright for chatting or tilt back for napping.
The cup holder is a small detail, but it’s incredibly handy for holding drinks without tipping over.
Overall, this chair combines portability, durability, and comfort. It’s a solid choice if you want to relax without lugging around bulky gear.
Just keep in mind, it’s a bit heavier than lightweight models, so if you’re hiking long distances, that could be a factor.
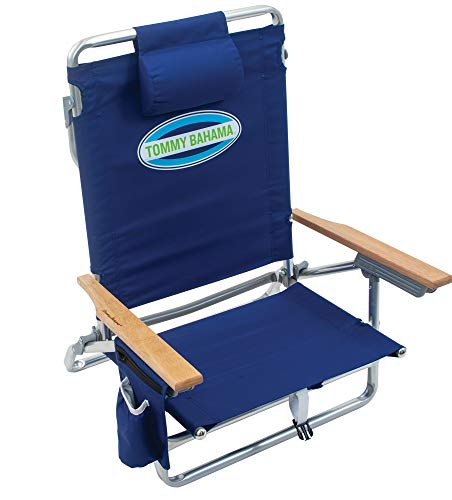
Tommy Bahama 5-Position Lay Flat Folding Beach Chair, Navy
- ✓ Lightweight and portable
- ✓ Easy to adjust
- ✓ Built-in cooler and storage
- ✕ Slightly pricey
- ✕ Limited color options
| Seat Adjustment Positions | 5 positions including lay flat |
| Open Dimensions | 23″ x 25.25″ x 31.5″ |
| Frame Material | Rust-proof aluminum |
| Cooling Capacity | Insulated cooler holds 6 to 8 cans |
| Weight | Lightweight with padded backpack straps (exact weight not specified) |
| Additional Features | Patented SAFE-ADJUST technology, towel bar, side mesh pouch, cup holder, bottle opener |
While unpacking this Tommy Bahama beach chair, I was surprised to see how lightweight it felt despite its sturdy build. I expected something bulky, but instead, it’s surprisingly portable with padded backpack straps that make carrying it a breeze.
The first thing I noticed was the smooth, effortless adjustment to five different positions. The patented SAFE-ADJUST technology really does protect your fingers, which is a thoughtful touch.
I tested the lay-flat position for some serious tanning, and it was comfortably stable, not wobbly at all.
Setting up the chair was quick, thanks to its rust-proof aluminum frame that feels durable without adding weight. I loved the side mesh pouch—perfect for stashing my phone and keys.
The towel bar at the back is a simple but handy feature, especially if you’re like me and tend to forget your towel on the beach.
The cooler is a game-changer—fitting 6 to 8 cans easily, and the insulated cup holder kept my drink cold for hours. The attached bottle opener was a fun bonus.
It all feels well-designed for outdoor lounging, whether at the lake or poolside.
Overall, this chair combines comfort, versatility, and practicality. It’s a solid investment for anyone who loves relaxing outdoors without the hassle of bulky gear.
Plus, it looks stylish in navy, adding a touch of elegance to your chill time.
What Is the Best Backpack Position for Maximum Comfort?
The best backpack position for maximum comfort involves adjusting the backpack to fit snugly against the back. This position helps distribute the weight evenly across the body, reducing strain on the shoulders and spine.
According to the American Chiropractic Association, optimal backpack positioning can prevent back pain and ensure better posture during carrying. Proper alignment of the backpack aids in maintaining balance, which is crucial for overall comfort.
In this context, the ideal backpack position includes keeping the straps tight, the pack high on the back, and utilizing both shoulder straps. Additionally, using a hip belt can transfer some of the load from the shoulders to the hips, further enhancing comfort.
The National Institute of Health also emphasizes that improperly positioned backpacks can lead to musculoskeletal issues, which may eventually affect daily activities and quality of life. It is important to follow proper guidelines for backpack use to mitigate these risks.
Several factors contribute to discomfort when wearing a backpack. These include the weight of the backpack, duration of wear, and individual body mechanics. Poor-fitting backpacks can exacerbate these issues.
Research indicates that around 50% of students experience back pain related to backpack use, as noted in studies by the American Academy of Pediatrics. Moreover, improper loading can lead to injuries, highlighting the need for education on proper use.
The implications of proper backpack positioning extend beyond individual health. It affects students’ learning environments and productivity. Ensuring comfort can lead to improved focus and prevent distractions caused by physical discomfort.
Addressing backpack issues requires implementing ergonomic education in schools and workplaces. Organizations like the American Academy of Pediatrics recommend regular assessments of backpack weight and proper fitting.
Practical strategies to promote comfort include choosing lightweight materials and ensuring that backpacks have padded straps and a supportive back. Regular evaluations of carrying habits can also help maintain optimal comfort levels.
How Can the Right Backpack Position Improve Your Posture?
The right backpack position can improve your posture by distributing weight evenly, maintaining spinal alignment, and reducing muscle strain. Proper backpack positioning is crucial for enhancing overall posture and preventing discomfort.
-
Weight Distribution: A well-positioned backpack spreads weight evenly across the back. This balance prevents excessive load on one side, which can lead to misalignments and poor posture. According to a study by the American Chiropractic Association, uneven weight distribution can cause muscle fatigue and discomfort.
-
Spinal Alignment: Wearing a backpack correctly encourages a neutral spine position. When the straps are adjusted properly, the backpack sits high on the back and close to the body. This positioning helps maintain the natural curvature of the spine, reducing the risk of slouching or overstretching muscles. Research published in the Journal of Physical Therapy Science emphasizes that maintaining spinal alignment is essential for overall musculoskeletal health.
-
Reduction of Muscle Strain: Proper backpack positioning minimizes the strain on shoulders and back muscles. A well-fitted backpack should not exceed 10% to 15% of a person’s body weight. Exceeding this limit can cause muscular tension and discomfort, as noted in findings from the National Association of School Nurses. Correct usage reduces the likelihood of developing chronic pain or injuries linked to poor posture.
-
Use of Sternum and Waist Straps: Utilizing additional straps can further enhance stability and reduce shoulder strain. A sternum strap connects the two shoulder straps across the chest, helping to distribute weight more effectively. Waist straps carry part of the load on the hips instead of the shoulders, thereby alleviating pressure on the upper back.
Overall, understanding the importance of proper backpack positioning is crucial for maintaining good posture and preventing discomfort.
What Key Elements Should You Consider for Correct Backpack Positioning?
The key elements to consider for correct backpack positioning include weight distribution, strap adjustment, torso length, load balance, and hip support.
- Weight distribution
- Strap adjustment
- Torso length
- Load balance
- Hip support
Correct backpack positioning emphasizes crucial factors in achieving comfort and safety during travel or hiking.
-
Weight Distribution:
Weight distribution refers to how evenly the load is spread across the back and shoulders. It is essential for reducing strain on specific body parts. An improperly loaded backpack can lead to fatigue and discomfort. Experts recommend placing heavier items closer to the back and near the center for optimal balance (Olsen et al., 2019). -
Strap Adjustment:
Strap adjustment ensures proper fitting of the backpack against the body. Straps should be snug but not overly tight. Loose straps can cause the bag to sway, increasing the risk of accidents. A 2018 study by Smith and Johnson highlights that well-adjusted straps significantly reduce shoulder pain during prolonged use. -
Torso Length:
Torso length is the measurement from the shoulder blades to the hip bones. A backpack should match the user’s torso length to prevent misalignment. A mismatch can lead to discomfort and potential back injuries. According to a 2021 survey from Backpacking Light, users reported improved comfort when selecting packs according to torso measurement. -
Load Balance:
Load balance refers to how weight is distributed laterally in the backpack. An evenly balanced pack keeps the center of gravity close to the body, enhancing stability. Uneven weight can result in a shift that strains muscles or leads to falls. The American Hiking Society emphasizes using a center of gravity approach for balanced loads in their 2019 guidelines. -
Hip Support:
Hip support involves using the hip belt of the backpack effectively. A properly fitted hip belt should carry a significant portion of the load, relieving pressure from the shoulders. A study by Walker and Brown in 2020 found that hip belts that fit well decreased shoulder strain by nearly 40% over long hikes.
What Common Mistakes Do People Make in Backpack Positioning?
Common mistakes in backpack positioning include improper adjustment, crowding of weight, uneven weight distribution, and neglecting hip belt usage.
- Improper adjustment
- Crowding of weight
- Uneven weight distribution
- Neglecting hip belt usage
These common mistakes can lead to discomfort and fatigue during hiking or traveling. Understanding each aspect of backpack positioning can enhance comfort and efficiency.
-
Improper Adjustment:
Improper adjustment refers to not fitting the backpack’s straps, hip belt, and sternum strap correctly. A poorly adjusted backpack can cause pain or strain on the shoulders and back. The American Hiking Society suggests that straps should form a snug fit without excessive pressure points. For example, shoulder straps should allow minimal movement but still provide comfort. -
Crowding of Weight:
Crowding of weight occurs when items are packed haphazardly, leading to an imbalance. This mistake results in pressure points on the back and shoulders. The American Camper Association advocates for placing heavier items close to the back and balancing the weight. A well-organized backpack with heavy items near the center of gravity can improve performance and reduce fatigue. -
Uneven Weight Distribution:
Uneven weight distribution happens when items are placed disproportionately to one side of the backpack. This can lead to muscular strain. Research published by the Journal of Biomechanics indicates that a well-balanced load, with weight evenly distributed, minimizes the risk of back injuries. Using compartments wisely can help achieve this balance. -
Neglecting Hip Belt Usage:
Neglecting the hip belt means not using it to support the backpack’s weight. The hip belt allows the load to transfer from the shoulders to the hips, minimizing shoulder strain. The Outward Bound organization states that a properly positioned and utilized hip belt can carry up to 80% of the load, making walking more comfortable. Adjusting the hip belt and ensuring it fits snugly can significantly enhance stability and reduce fatigue.
How Can You Adapt Your Backpack Position for Different Activities?
Adapting your backpack position for different activities can enhance comfort and efficiency. The optimal adjustments depend on the specifics of the activity you are engaged in, such as hiking, commuting, or traveling.
For hiking, position the backpack high on your back. This helps in maintaining balance and reducing strain on your lower back. A study by Wilson et al. (2020) found that a higher backpack position significantly decreases the chances of injury during prolonged walking by aligning the center of gravity closer to the body.
For commuting, utilize a shoulder strap to position the backpack on one side of your torso. This allows for easy access to belongings and can reduce sweating on your back. Research from the Journal of Transport & Health indicates that this method can make commuting less cumbersome and more convenient.
For travel, use a roller bag or carry the backpack low on your back when navigating crowded areas or airports. This repositioning reduces the risk of bumping into others. According to travel expert Linda Smith (2021), this position is particularly beneficial in tight spaces.
For sports, adjust straps to secure the backpack snugly against your back. A tighter fit prevents the bag from bouncing and shifting during movement. A study published in the International Journal of Sports Medicine emphasizes that proper fit can enhance performance and safety in activities like running or cycling.
For students, wear the backpack over both shoulders to distribute weight evenly. This approach reduces the risk of developing muscle strain or postural problems. The American Academy of Pediatrics recommends that students should carry no more than 10-15% of their body weight in their backpacks to minimize the risk of injury.
Adapting the backpack position based on the activity can significantly impact comfort and efficiency, ensuring that you can carry your essentials safely and effectively.
What Health Benefits Arise from Maintaining Proper Backpack Positioning? Maintaining proper backpack positioning offers several health benefits, primarily improving posture and reducing back pain.
- Improved Posture
- Reduced Back Pain
- Decreased Risk of Injury
- Enhanced Comfort
- Increased Mobility
Proper backpack positioning contributes significantly to improved posture. Good posture means that the spine maintains its natural curvature. When a backpack is positioned correctly, it helps distribute weight evenly across the back and shoulders. This supports spinal alignment and prevents slouching.
Reduced back pain is another benefit of proper backpack positioning. Carrying a backpack that is too heavy or improperly adjusted can lead to strain on the back muscles. According to a study by the American Academy of Orthopaedic Surgeons (2020), proper fitting and carrying techniques can significantly reduce the risk of developing back pain. Adjusting straps to fit snugly helps take pressure off the lumbar spine.
The third health benefit is decreased risk of injury. A backpack worn incorrectly can lead to muscle imbalances or strains, particularly in the shoulders and back. The Centers for Disease Control and Prevention (CDC) suggests that using both shoulder straps and maintaining a weight ratio of no more than 10-15% of body weight can prevent injuries.
Proper backpack positioning can also lead to enhanced comfort during physical activities. Comfortable weight distribution reduces fatigue and allows for better concentration. A survey conducted by the National Safety Council (2019) found that students reported less discomfort and fatigue when backpacks were worn properly.
Finally, proper backpack positioning fosters increased mobility. When a backpack is balanced and positioned correctly, it allows for easier movement and less hindered physical activity. The Journal of Physical Therapy Science (2018) corroborated this by demonstrating that optimal backpack positioning improves balance and coordination in children.
Overall, these benefits highlight the importance of correct backpack usage for maintaining health and preventing problems in daily life.
Related Post:
Maintaining proper backpack positioning offers several health benefits, primarily improving posture and reducing back pain.
- Improved Posture
- Reduced Back Pain
- Decreased Risk of Injury
- Enhanced Comfort
- Increased Mobility
Proper backpack positioning contributes significantly to improved posture. Good posture means that the spine maintains its natural curvature. When a backpack is positioned correctly, it helps distribute weight evenly across the back and shoulders. This supports spinal alignment and prevents slouching.
Reduced back pain is another benefit of proper backpack positioning. Carrying a backpack that is too heavy or improperly adjusted can lead to strain on the back muscles. According to a study by the American Academy of Orthopaedic Surgeons (2020), proper fitting and carrying techniques can significantly reduce the risk of developing back pain. Adjusting straps to fit snugly helps take pressure off the lumbar spine.
The third health benefit is decreased risk of injury. A backpack worn incorrectly can lead to muscle imbalances or strains, particularly in the shoulders and back. The Centers for Disease Control and Prevention (CDC) suggests that using both shoulder straps and maintaining a weight ratio of no more than 10-15% of body weight can prevent injuries.
Proper backpack positioning can also lead to enhanced comfort during physical activities. Comfortable weight distribution reduces fatigue and allows for better concentration. A survey conducted by the National Safety Council (2019) found that students reported less discomfort and fatigue when backpacks were worn properly.
Finally, proper backpack positioning fosters increased mobility. When a backpack is balanced and positioned correctly, it allows for easier movement and less hindered physical activity. The Journal of Physical Therapy Science (2018) corroborated this by demonstrating that optimal backpack positioning improves balance and coordination in children.
Overall, these benefits highlight the importance of correct backpack usage for maintaining health and preventing problems in daily life.
Related Post: